It's not always possible to ship logs directly from an application to a centralized log server like Seq. Many interesting systems, new and old, write text or JSON log files locally, and rely on a separate collector to read, parse, and ship them.
This post shows how to tail a folder of log files, and send the contents to Seq for easy search and analysis, using Fluent Bit.
Fluent Bit
Fluent Bit is a vendor-neutral log shipper developed under the CNCF. It supports a wide range of input plug-ins, including files-on-disk, queues, and more complex sources such as the Windows Event Log.
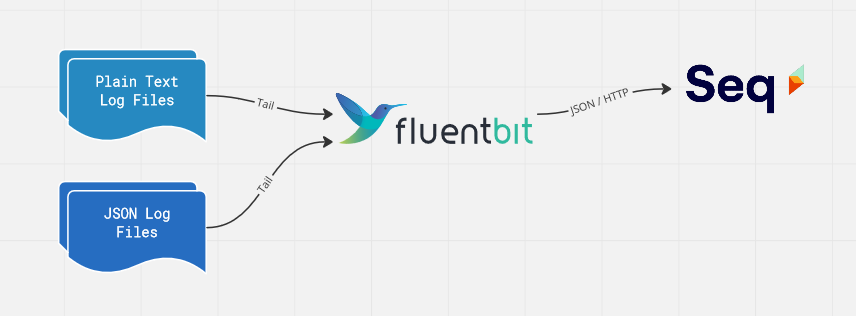
Once they're read by Fluent Bit, log events can be filtered and manipulated before being sent to one or more output plug-ins, including a few that are compatible with Seq like HTTP/S, GELF, or syslog.
Installing and configuring Fluent Bit
Once you've downloaded either the installer or binaries for your platform from the Fluent Bit website, you'll end up with a fluent-bit executable, a fluent-bit.conf file, and a parsers.conf file.
fluent-bit/
    bin/
        fluent-bit[.exe]
    conf/
        fluent-bit.conf
        parsers.conf
On Windows you'll find these under C:\Program Files\fluent-bit unless you customized the installation path.
You can run fluent-bit with the default .conf files to check that everything's ready to go:
./bin/fluent-bit -c ./conf/fluent-bit.confThe two .conf files are where we'll add our configuration, so now's a good time to open those up in your editor of choice.
Tailing a folder
For the purposes of this example, we'll assume you have a folder of log files, logs/*.log.
Your log format could be just about anything, so for illustration I'll use a really simple format with an ISO-8601 timestamp, followed by a space, a message, and a newline.
2022-10-18T05:44:41.3830613Z Hello, world!
2022-10-18T05:44:42.9375927Z Oven temperature 208 degrees
In the fluent-bit.conf file, you'll find an [INPUT] section. Replace everything there with:
[INPUT]
    Name         tail
    Parser       simple
    Path         .\logs\*.log
    DB           .\tail.db
Here's what each field means:
- Name - this selects the input plug-in to use. We need
tailfor monitoring text files. The Fluent Bit docs list a whole range of other input plug-ins to try. - Parser -
simpleis the name of the parser I've defined inparsers.confthat we'll check out in a moment. The parser's job is to break log lines down into individual fields like a timestamp and message. - Path - this identifies one or more log files to tail, and supports the
**and*wildcards. It's a good idea to specify a fully-qualified path here for real-world deployment. - DB - the tail plug-in keeps track of what files its already shipped, and its progress in each file, using a local SQLite database at this path.
On Windows, thePathargument must use backslash\separators in order to work with wildcards in Fluent Bit 1.9.
Note that the tail plug-in will only ship new events by default, ignoring anything already in the log files when it's first started. To change this behavior and ship historical logs too (useful for testing), you can optionally add:
Read_from_Head onNow onto parsers.conf, the simple parser we're using can be added to the end of the file:
[PARSER]
    Name        simple
    Format      regex
    Regex       ^(?<time>[^ ]+) (?<message>.+)$
    Time_Key    time
    Time_Format %Y-%m-%dT%H:%M:%S.%L%z
The fields are:
- Name -
simpleis the name we've given to this parser, refered to using theParserfield in the[INPUT]configuration. - Format - this parser is defined using a regular expression; check out the Fluent Bit docs for other options including pre-built parsers for several common formats.
- Regex - super-simple, we'll treat all lines as log events, with the first token specifying a timestamp, and the rest of the line the message. The regular expression uses
(?<name>...)named capture groups to give the extracted fields names, and these end up as properties on the resulting log events. - Time_Key - selects which field extracted by the regular expression will be used as the log event's timestamp.
- Time_Format - shows Fluent Bit how to parse the extracted timestamp string as a correct timestamp.
Shipping to Seq
Seq can ingest newline-delimited JSON posted via HTTP. This is generally the easiest and best way to get events into Seq, since API keys are fully supported, and no additional input plug-ins are required.
Seq recognizes a handful of "special" JSON payload properties defined in the CLEF format. We'll use a filter and the Fluent Bit HTTP output to get log events into the right shape.
Back in fluent-bit.conf, we'll replace the remaining default [FILTER] and [OUTPUT] sections with:
[FILTER]
    Name    modify
    Match   *
    Rename  message @m

[OUTPUT]
    Name             http
    Match            *
    Host             localhost
    Port             5341
    URI              /api/events/raw?clef
    Header           X-Seq-ApiKey yQDwNvt1KdwM8N6SkgqR
    Format           json_lines
    Json_date_key    @t
    Json_date_format iso8601
    Log_response_payload False
[FILTER] is just doing one simple job, here: our parser extracts the log message into a message field, while Seq expects this in @m. The filter renames the message so that everything is nice and readable in the Seq UI.
Different Fluent Bit log inputs will have different fields attached, so each one will likely need its own [FILTER] to get things looking great.The output turns the Fluent Bit pipeline's view of an event into newline-delimited JSON for Seq to ingest, and ships this in batches using HTTP.
Here's how the [OUTPUT] block is working:
- Name - just like the
tailplug-in we used for input,httpidentifies the HTTP output plug-in. - Match - the pipeline we're using here just sends everything to Seq; the match option allows more sophisticated pipelines to be built.
- Host - the hostname of your Seq server, e.g.
logs.example.com. - Port - the port on the Seq server that will receive logs. This will most likely be
443, if you have Seq configured with HTTPS. - URI - the path to the Seq ingestion endpoint. The
?clefparameter indicates the content type (we could alternatively have used a header for this). - Header - the
X-Seq-ApiKeyheader allows an API key to be specified. API keys provide fine-grained visibility and control over ingestion so this is highly recommended, but you can leave this out if you prefer unauthenticated ingestion. - Format - the HTTP output plug-in supports a few options here; Seq needs newline-delimited JSON, which Fluent Bit calls
json_lines. - Json_date_key - CLEF uses
@tto carry the timestamp. - Json_date_format - CLEF expects ISO-8601 date/time formatting.
- Log_response_payload - turning this off saves some noise at the terminal when debugging; you can use Seq's Ingestion Log to get information about failed payloads, if any occur.
Finally, if your Seq server uses HTTPS, you'll need to add one last field:
TLS onIf you think back to the original two log lines shown earlier, they'll reach Seq in an HTTP POST payload resembling:
{"@t":"2022-10-18T05:44:41.3830613Z","@m":"Hello, world!"}
{"@t":"2022-10-18T05:44:42.9375927Z","@m":"Oven temperature 208 degrees"}
Putting it all together
When you run fluent-bit with your updated configuration files, if all is well, logs will start to flow:
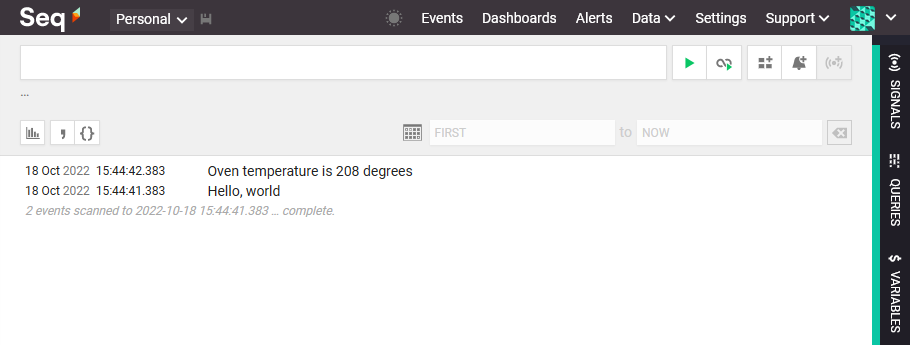
Remember that in the default configuration, only new events will be written, so you might have to open your log file and paste in a few fake events to see some activity (or add the Read_from_Head option mentioned earlier).
If things go wrong, the Fluent Bit docs and GitHub issues have a wealth of information to refer to. If you're still stumped, please drop us a line so we can help 🙂